How do I collect from Microsoft 365?
The Nanitor Microsoft 365 Foundations benchmark collects configuration data from your Microsoft 365 tenant through the Nanitor Collector using the Microsoft Graph API.
Existing customers (pre-August 2025)
If you set up M365 collection before Nanitor v6.4.0 (August 2025), your collector is likely missing required PowerShell modules and may have insufficient Graph API permissions. See Remediation for Existing Customers below.
Prerequisites
Before starting, confirm the following on your collector host:
- Windows-based collector required. The Microsoft Graph PowerShell cmdlets do not run on Linux. M365 collection requires a Windows host.
- PowerShell 7 or later installed. Earlier versions may have compatibility issues with the Graph modules.
- Execution policy must be
RemoteSignedor less restrictive. Check withGet-ExecutionPolicy. Set if needed:Set-ExecutionPolicy RemoteSigned -Scope LocalMachine. - Global Administrator or Privileged Role Administrator access in the M365 tenant to grant admin consent on API permissions.
Step 1 — Install Required PowerShell Modules
Run the following in an elevated PowerShell session (Run as Administrator) on the collector host:
Install-Module Microsoft.Graph -Scope AllUsers -Force -AllowClobber
Install-Module Microsoft.Graph.Beta -Scope AllUsers -Force -AllowClobber
Why both modules?
Several Microsoft 365 Foundations benchmark controls query /beta/ Graph endpoints. Both Microsoft.Graph and Microsoft.Graph.Beta are required. Using -Scope AllUsers ensures the modules are available to the Nanitor collector service account.
Verify the installation:
Get-Module Microsoft.Graph -ListAvailable
Get-Module Microsoft.Graph.Beta -ListAvailable
Both should return version information. If either returns nothing, the installation did not succeed.
Step 2 — Register an Application in Microsoft Entra ID
- Sign in to the Microsoft Entra admin center as a Global Administrator or Application Administrator.
- Navigate to Identity → Applications → App registrations → New registration.
- Enter a name of your choice (e.g.
Nanitor Collector). - Under Supported account types, select Accounts in this organizational directory only (Single tenant).
- Leave Redirect URI blank. Click Register.
- On the Overview page, note the Application (client) ID and Directory (tenant) ID — you will need both when configuring the Nanitor Collector credential.
Step 3 — Grant API Permissions
The Microsoft 365 Foundations benchmark requires the following Application permissions (not Delegated). All permissions require admin consent.
In the app registration, go to API permissions → Add a permission → Microsoft Graph → Application permissions and add each of the following:
| Permission | Purpose |
|---|---|
Group.Read.All |
Group and group settings checks |
GroupMember.Read.All |
Group membership checks |
Domain.Read.All |
Domain configuration checks |
Policy.Read.All |
Authorization and admin consent policy |
Application.Read.All |
Service principal checks |
Directory.Read.All |
Directory-wide read access |
DeviceManagementConfiguration.Read.All |
Device management settings |
Organization.Read.All |
Tenant organization settings |
AuditLog.Read.All |
Audit log access |
RoleManagement.Read.Directory |
Role assignment checks |
After adding all permissions, click Grant admin consent for [your organization]. Every permission must show a green checkmark under the Status column. Permissions without admin consent will cause those benchmark controls to fail silently.
Step 4 — Create a Client Secret
- In the app registration, go to Certificates & secrets → Client secrets → New client secret.
- Enter a description and set an expiry (maximum 24 months).
- Click Add. Copy the Value immediately — it is only shown once.
Client secrets expire
When a client secret expires, the collector will silently begin returning 401 Unauthorized errors. Set a calendar reminder to rotate the secret before it expires. After rotating, update the credential in the Nanitor Collector configuration.
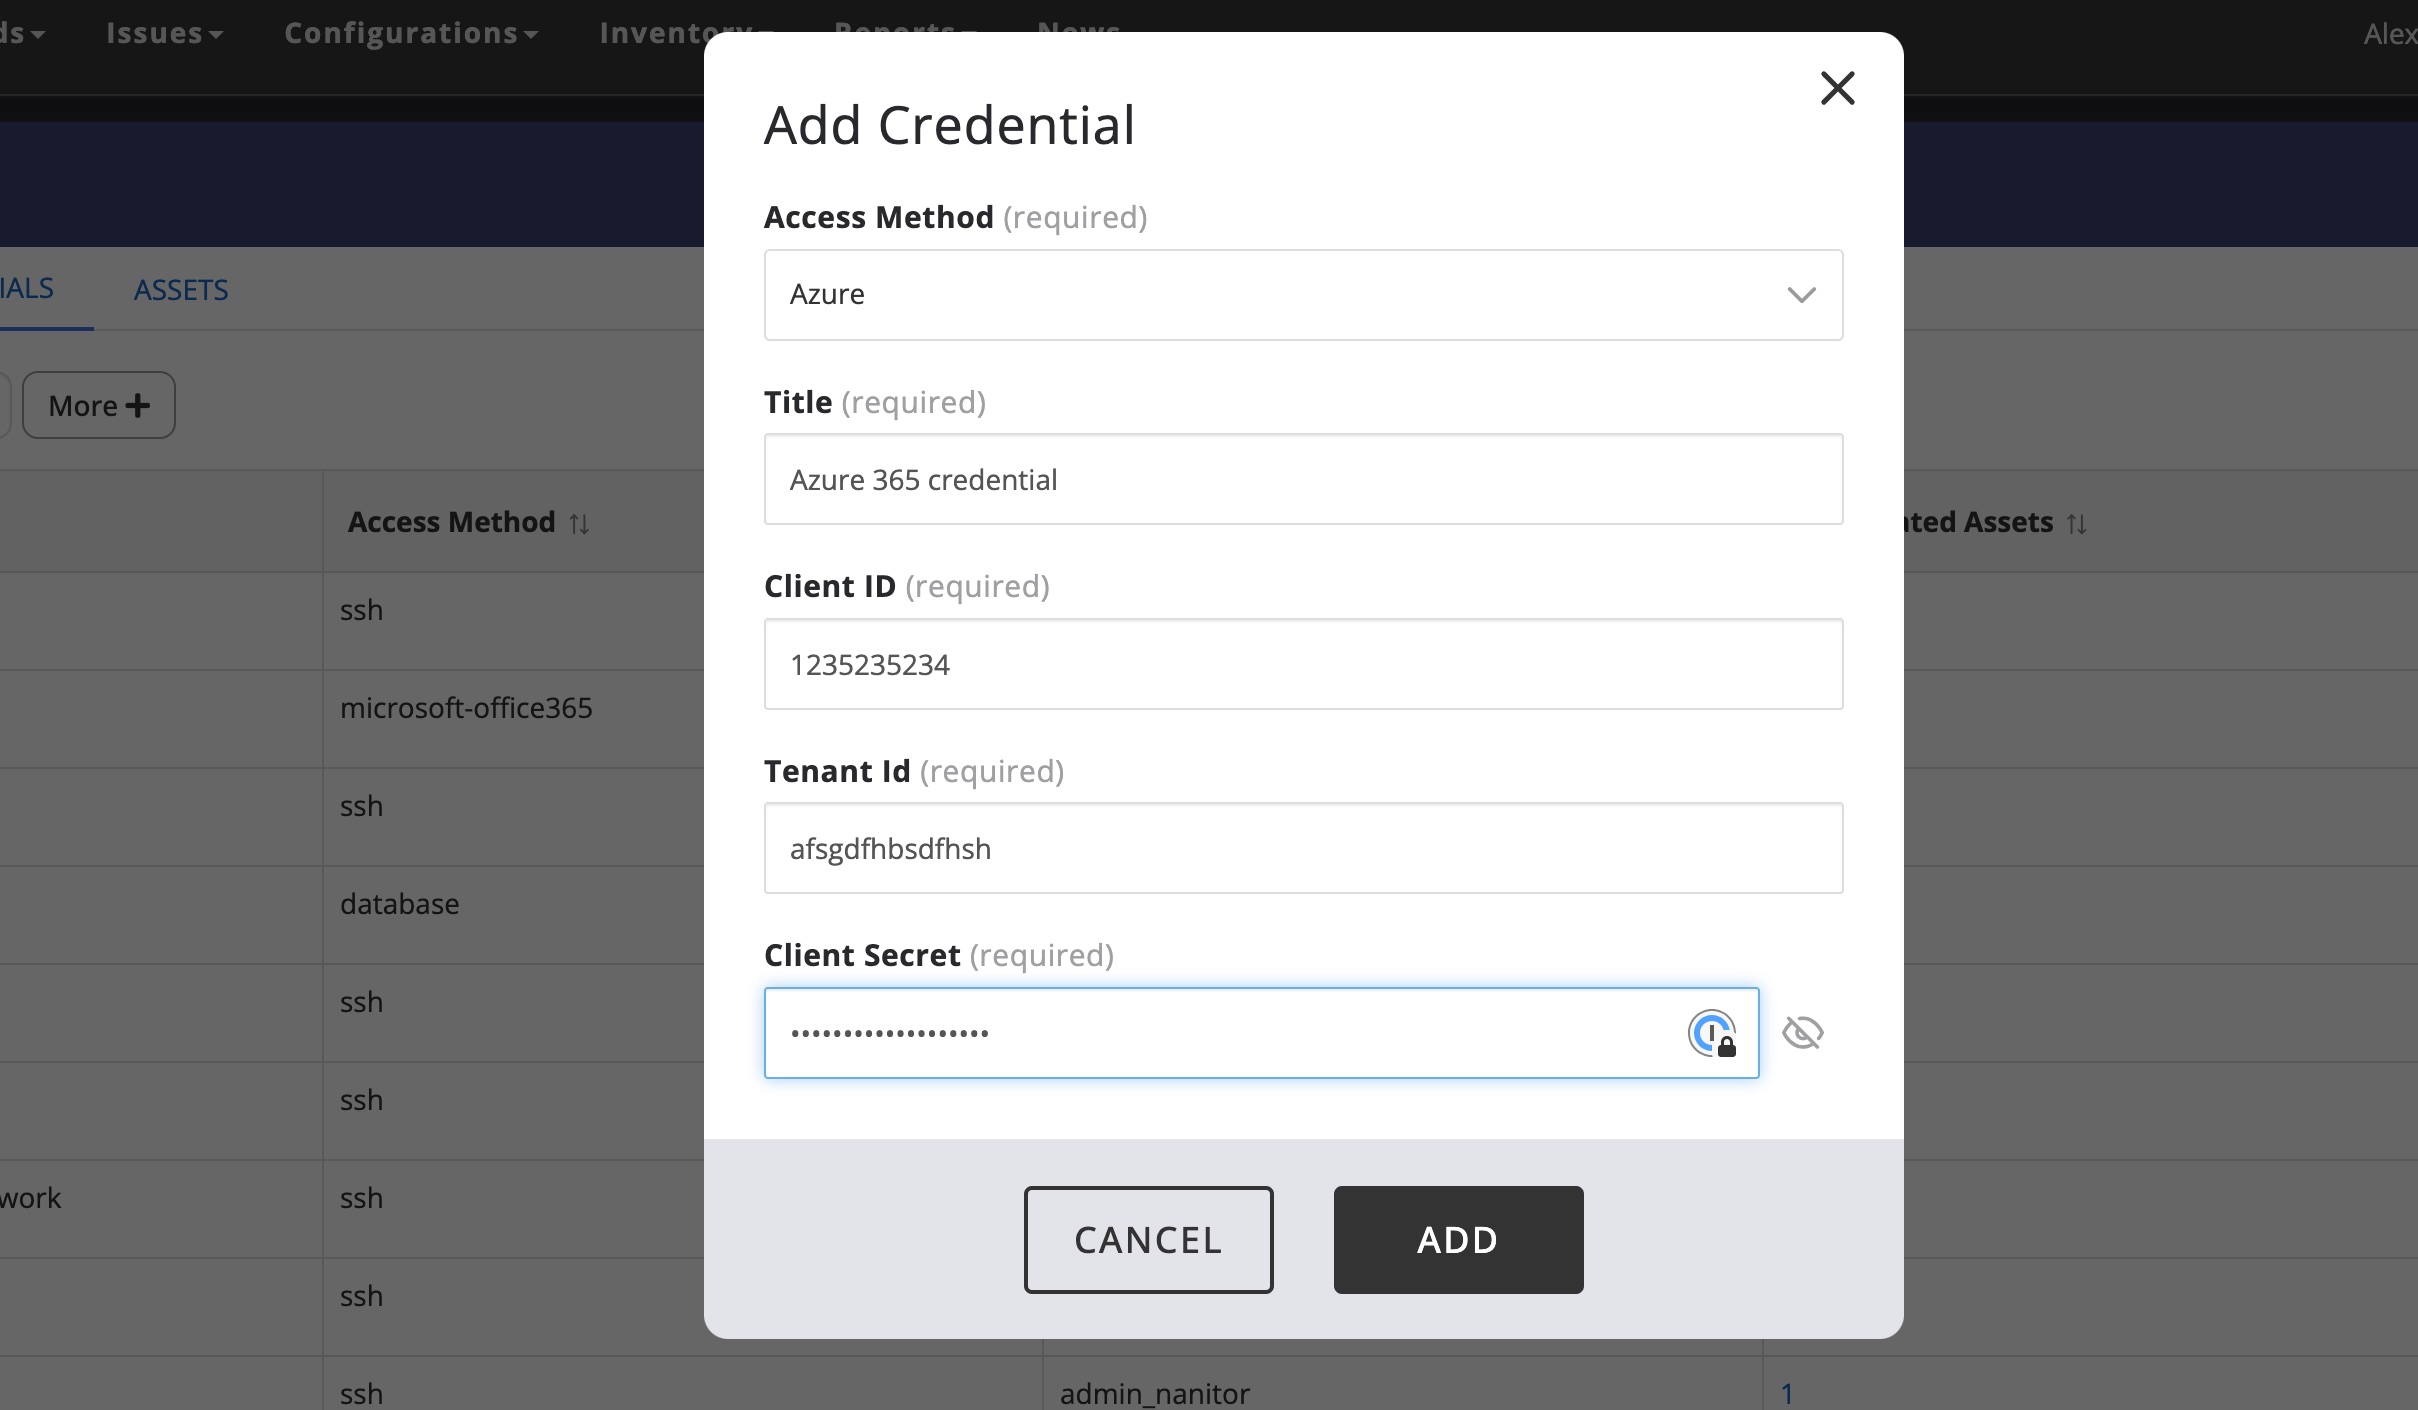
Step 5 — Configure the Nanitor Collector Credential
In the Nanitor UI, navigate to Organization Management → Collectors → Credentials and add a new credential.
Select Azure as the Access method and fill in:
- Client ID — the Application (client) ID from Step 2
- Tenant ID — the Directory (tenant) ID from Step 2
- Client Secret — the value copied in Step 4
Step 6 — Start Data Collection
Go to the Asset tab and select Add asset.

In the dialog:
- Set Asset type to Cloud
- Select your Collector
- Give the environment an identifiable Name
- Set Cloud type to Microsoft
- Select the Credential created in Step 5
- Set a Label to define priority (can be done later)
The collector will authenticate and run the first collection. Results appear in the Nanitor UI within a few minutes and are refreshed once every 24 hours.
If results do not appear, confirm the Microsoft 365 Foundations benchmark is enabled under Administration → Organization Management → Benchmarks.
Verification
After setup, confirm the following:
- On the collector host, the Graph module is available:
Get-Module Microsoft.Graph -ListAvailable - In Entra ID, go to Enterprise applications → [your app] → Permissions and confirm all required permissions show green checkmarks.
- Trigger a manual checkin from the collector UI and confirm benchmark results appear in the Nanitor UI.
Remediation for Existing Customers
If you configured M365 collection before August 2025 (Nanitor v6.4.0), you are likely affected by missing PowerShell modules, insufficient permissions, or both.
Missing PowerShell modules
Symptom: Collector logs show CommandNotFoundException: The term 'Connect-MgGraph' is not recognized. The collector may still report "Successfully checked in SCAP info" — this is a known silent-failure behaviour and does not mean collection succeeded.
Fix: On the collector host (elevated PowerShell):
Install-Module Microsoft.Graph -Scope AllUsers -Force -AllowClobber
Install-Module Microsoft.Graph.Beta -Scope AllUsers -Force -AllowClobber
Insufficient API permissions
Symptom: Modules are installed but benchmark controls return empty results or consistently fail.
Fix: Add all permissions listed in Step 3 to your existing app registration and grant admin consent. You do not need to create a new app registration.
Troubleshooting
| Symptom | Cause | Fix |
|---|---|---|
CommandNotFoundException: Connect-MgGraph |
Microsoft.Graph module not installed for the service account | Install with -Scope AllUsers (Step 1) |
/beta/ endpoint checks fail, /v1.0/ checks pass |
Microsoft.Graph.Beta module not installed |
Install Microsoft.Graph.Beta -Scope AllUsers (Step 1) |
| 401 Unauthorized in collector logs | Client secret expired or wrong tenant ID | Rotate the client secret (Step 4), verify tenant ID |
| All controls return empty results despite successful checkin | Permissions are Delegated type instead of Application, or admin consent not granted | Verify all permissions are Application type with admin consent granted (Step 3) |
| Cmdlets not found on Linux collector host | M365 collection requires Windows | Move the collector to a Windows host |
| No benchmark results after setup | Collector hasn't checked in yet, or benchmark not in scope | Trigger a manual checkin; verify Microsoft 365 Foundations benchmark is enabled in Organization Management |