How do I install/distribute the Nanitor Agent on Windows?
Supported devices
The Nanitor agent can be set up on any machine with a Windows operating system (including a Windows domain controller). Once the agent is installed and starts feeding information into the Nanitor Server, Nanitor will apply the corresponding benchmark to the asset.
If you want to configure agent specific proxy, see the Agent proxy setup guide
Preparing
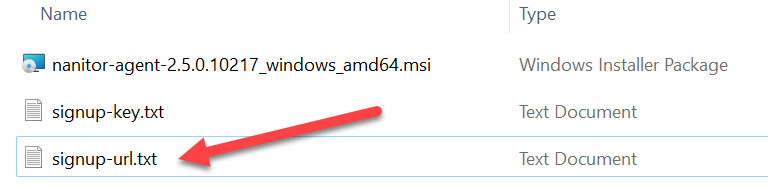
First, download the Nanitor agent onto the system in question, here are the instructions. These instructions will focus on manually installing via the GUI. For CLI or automation installation you can download the agent directly from https://nanitor.io/agents/nanitor-agent-latest_amd64.msi or https://nanitor.io/agents/nanitor-agent-latest_i386.msi depending on your needs and grab the signup URL according to these instructions.
Installation
Clicking on the Windows installer will prompt for a Signup URL
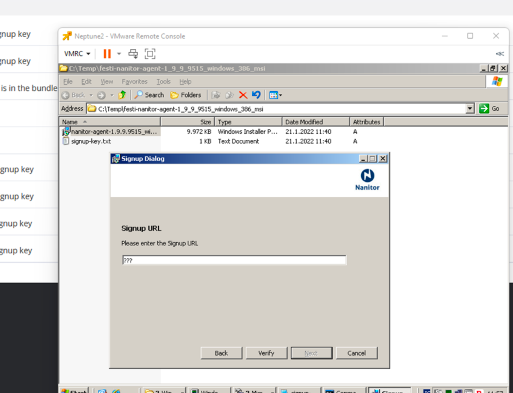
Paste in the Signup URL from the signup-url.txt document in the installation zip file
Signup-URL is also available from the download section in the portal, check out these instructions for more details on how to do that. After you provide the signup URL, just follow the wizard and the agent will be installed.
If you need to configure a proxy so the agent can reach your server instance, you can find the instructions here.
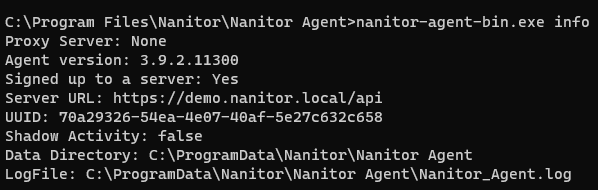
To see if the signup succeeded you can run this command from an administrative terminal:
C:\Program Files\Nanitor\Nanitor Agent\nanitor-agent-bin.exe info
The normal output should look similar to this
If the agent signup failed, you can retry the signup with this command, making sure you replace <signup-url> with your actual signup URL
C:\Program Files\Nanitor\Nanitor Agent\nanitor-agent-bin.exe signup --key <signup-url>
Note: these paths assume a freshly installed system. On systems which have undergone automatic agent upgrade, there is a version folder with various versions.
Automatic deployment
To automate the process and install silently (with distribution tools such as SCCM, PDQ, Intune, Puppet, etc.), or simply do the install via CLI, we simply need to populate two properties, ACCEPTEULA and SIGNUP_URL, and then we use msiexec to install it. You can load the MSI directly into your deployment tool after downloading the appropriate file according to these instructions or you can download the agent directly from https://nanitor.io/agents/nanitor-agent-latest_amd64.msi or https://nanitor.io/agents/nanitor-agent-latest_i386.msi depending on your needs and grab the signup URL according to these instructions.
Here is how to use msiexec.exe to install the agent, of course making sure you replace <signup-url> with your actual signup URL:
msiexec.exe /i "nanitor-agent-3.4.1.10810_windows_amd64.msi" ACCEPTEULA="yes" SIGNUP_URL="https://<yourSignUpUrl>" /qn
You can add proxy configuration directly in the command with PROXY_URL="proxy.nanitor.biz:3128" or PROXY_URL="user:[email protected]:3128" depending on if your proxy requires auth or not.